Saturday, September 29, 2012
A to Z
5:14 PM
It has been awhile since I have had an opportunity to post on my blog. Life just gets away from you and I feel like all I do lately is play catchup. What I have been working on only is my new collection and the photo shoot I will be having for my lookbook on October 13th.
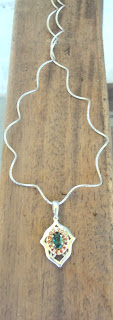
As some of you have heard me talk about, my "mother piece" was finally completed. This piece was something I designed almost three years ago. I knew I wanted to do something with the sketch as soon as I was finished with it, but did not have the resources or training to pull something like this off yet. So I waited and kept redrawing the idea so as soon as I did have the skills I would know what I wanted.
After completing bench jeweler school and saving some funds I got the go ahead from my husband to use the money for my 'experiment.' I had already finished the research on who I wanted to do the CAD design (the 3D imaging to produce a wax and cast) so I sent in my sketch with measurements (as you can see below) to them. After several weeks of going back and forth, changing a few touches and measurements, I confirmed the design. My caster went to work then and produced the 3D image, molds, and casts in less than two weeks.
I received the molds and casts and was so excited I barely knew how to begin putting pieces together and setting the gemstones and diamonds. My mind went into overdrive. Many that know my work know that I do have things cast, but that each piece is then handcrafted by me into a special, one-of-a-kind. Once all of my pieces for the pendant arrived I had already received the diamonds and gemstones and knew exactly what I wanted to set. I had a plan, but realized the piece looked better switched around. I thought this was no issue so continued on with my plans, incorporating the changes.
My problem was I had jumped ahead and forgot the important lesson to remember each step and what problems I may encounter during the process. I set the burnt orange diamonds, but then realized right after that my vendor strongly suggested never applying heat to the diamonds since they would loose the heat treatment possibly. Something that is very common sense, but I had jumped ahead. I researched and called around to see what options I had. I could destroy the 14k yellow gold setting and remove the diamonds or I could risk the diamonds and apply the heat (I was even told laser welding was a risk). After many attempts for many days with safer strategies that ended in bigger messes I finally went for the original, more risky plan. The diamonds were fine, but other parts were ruined in the process and many lessons were learned. I had also switched where I wanted to set the greenish blue tourmaline, which I had thought would be no problem. Because the setting was going to be below and in the center of the entire piece I thought it would be an easy solder and easy setting (again, got ahead of myself). Many burnings and angry words later I realized it was never that easy.
More lessons learned. My objective was to have this main piece ready by my 30th birthday, as a present and goal to reach for my 30th birthday. Two days before I actually reached it and the piece turned out just like I had hoped. After I had time to relax and take a breather I realized the wonderful things I had learned and experiences gained from this piece. Yes, I had spent a bunch of time and money on this one item and was taking a bunch of risks, but I had learned new processes and a better understanding that you just do not gain from class, only from experience.
I am not 13 days away from the photo shoot and gunning to get everything finished and perfected for the catalog. This huge step towards my future with my first piece was a hurdle that I am so happy to have completed. I am very excited to share this with you all and hope you are as happy with as I am. Thank you!!

Subscribe to:
Comments
(Atom)


